I remember someone telling me that “this house has good bones” before I bought it. As it turns out, when we stripped the walls out, we found out that the bones weren’t all that great. The point is moot because we ripped out most of the “bones” and threw them in the trash.
This all seems like so long ago. Quick recap of the timeline:
- September 2014: I decide to start looking for a house.
- October 2015: I found what I wanted and put an offer down.
- December 2015: We close on the house and I now own it. Piece of cake, should be done with everything and moved in at worst by November 2016, right?
- March 2016: We submit final drawings and plans to Union City.
- September 2016: After several iterations, Union City grants us building permits.
- October 2016: Demolition begins. Following that is excavation and masonry in the front and back of the house.
- September 2017: Masonry and demolition is complete. Yes, that phase of the project took a year.
- October 2017: Framing begins.
- November 2017: Framing is complete, roof is installed.
Several other people have told me that they can’t believe how patient I am. Maybe I wear it well, but I don’t feel patient at all. If they were mind readers, they’d know that I’m ready to rip my hair out and jump in the Hudson River. It’s been over three years since I decided that I wanted to buy a house and leave my Hoboken apartment. Here I sit in front of the keyboard in my condo with a baby crying on the other side of my living room wall.
However, there is a huge bright side to this story, and as frustrated as I’ve been, I’ve never been more excited about this project. As per item #9 above, the framing is done! I can now walk around in the house and see what it really looks like after staring at plans for over a year. I can officially exclaim that this house really does have good bones!
Not only that, but once the framing is done, we can move forward on everything else that needs to be done, and we can start working on several things in parallel. I’m no longer at the mercy of my friend, the mason, who was holding the entire project up.
Building the Frame
Framing is a much more straight-forward and streamlined process than masonry work, as I learned. The framers tend to show up and stay on the job site until most everything is done. The bulk of the work took about three weeks, with a few things that needed to be done at the end that were based on decisions we made as things were built.
I opened an account with Kuiken Brothers, who would supply the framing materials and supplies. The framer would call in orders to Kuiken as needed, and they would deliver everything immediately.
The house was partially demolished, and we preserved the east and west walls of the existing frame. The north wall, facing the back yard, was demolished completely before the framer started. The south wall on the front of the house stayed in place and was dismantled as the frame went up. The floor between the first and second floors had to be demolished in parts while bracing the existing east and west walls so they would not collapse while the new frame was being built.

The first floor of the frame taking shape

The first floor of the frame taking shape in the front of the house. The old front wall was demolished as the new front wall was built.

The second floor as it is being built. This is the view from the master bedroom.

The first floor as it is being built. The existing frame had to be braced while the new one was being built around it.
The house is sheathed in Georgia-Pacific DensGlass Sheathing. This is to get the house in-line with current fire code. It will prevent fires that start inside the house from spreading outside for a short while. The new frame is sheathed entirely in DensGlass. It was also applied to the outside of the existing frame.

DensGlass Sheathing surrounding and fireproofing the house.
A temporary staircase was built between the first and second floor. The existing floor joists between the basement and the first floor were re-used and “sistered” to the new floor joists that were installed. The reconfiguration allowed us to make room to build a wider staircase than the one that was there. The existing staircase was maybe a foot and a half wide, you had to walk up and down it sideways. It was very unsafe and certainly not up to any kind of modern building code.

The old joists (the dark one) were sistered to the new floor joists in the basement.

The finished basement staircase, much safer and wider than the old one.
As the frame went up, I was finally able to walk around inside the house to get a feel for the size and layout. I had a very good idea after having stared at the drawings for so long, but that is not the same as being inside of it in real life.
The open layout of the first floor is strikingly large in contrast to my current apartment. All in, the first floor is about 200 square feet bigger than my entire apartment, including my bedroom. There are just two rooms: the bathroom, and everything else! There is no separation between the living room, dining room, and kitchen. This is a distinctive feature that I insisted on from the beginning and I’m very excited to actually see it in person.

A clean view of the first floor with it’s open floor plan.
The second floor is going to have an interesting look and feel to it as well. It is divided into three bedrooms, two bathrooms, a linen closet, a hallway, and a washer/dryer closet.
The bedroom in the front of the house facing south has two large window cut outs, two closets, and a ceiling that slopes downward from south to north. The decision was made to slope the ceiling as the house was being framed, the architect noted that there was space to do it once he saw how the frame was taking shape. It is going to be a rather large space and has a lot of potential for various uses.
The middle bedroom and main bathroom will be ordinarily shaped with level ceilings. The middle bedroom had just enough space between my house and the neighbors (something like three feet and an inch) to be allowed to have a window by fire code. Had it not had enough space for a window, technically it wouldn’t count as a bedroom.
The master bedroom is also very uniquely shaped. It begins at the extension of the house so the roof was raised and then sloped downward towards the back of the house. Therefore, the ceiling will be sloped in the same direction. It comes with a walk in closest and a bathroom. The bathroom will have a walk-in shower and a window facing the back yard.

The frame taking shape on the second floor. This is the view from the master bedroom facing the front of the house.
Time to Make Some Decisions
Once the house is framed, you can proceed with pretty much everything else that needs to be done in the house. You can take a look at the frame and decide if the plans are going to work out, or if you have to make adjustments to the design.
One of the first things we had to decide was how to heat and cool the house. My GC brought in a trusted HVAC guy he’s been working with for years. I was a little late getting to our initial meeting at the job site and they had started without me.
The drawings stated that the house would be heated with forced air and centrally cooled in a two-zone system through ducts. The first thing the HVAC guy said was that there was no room for ducts in the plans and that we’d have to make adjustments.
The first suggestion the HVAC guy made was to consider a ductless mini-split system. This system would include several outdoor heating and cooling units mounted on the sides and back of the house, and they would be attached by hose to wall mounted indoor units placed throughout the house. The indoor units would protrude from the walls and would be programmable by remote control.
The mini-split system comes with a major drawback, in that in extremely cold weather, they won’t be able to heat the house well enough. So, we would have to also install baseboard heating as a backup for the mini-split system.
The mini-splits also don’t have any kind of smart interface to them. So, I would never be able to use my Amazon Echo to control the temperature, I would have to use the remote controls.
Given the design aesthetic, the lack of a programmable interface, and the need for a secondary heating system, I wasn’t very enthused with this plan.
An idea that I had coming into the discussion was to use heated floors, sometimes called radiant heating. This is a way to hook up a system of tubes that carry hot water throughout the sub-flooring just below the finished floorboards. This is an extremely energy-efficient method of heating. It is virtually invisible throughout the finished section of the house as it is below the floors and doesn’t require any vents. From an aesthetic standpoint, this is the best way to go.
Unfortunately, heated floors come with a very high upfront cost. They would also require a separate cooling system be installed. My contractor eventually priced out this option and it was a budget-buster so I had to say no.
The HVAC guy said something interesting to me while we were discussing options. He asked if I liked an industrial look to the house. I asked him why he asked that. He then floated the idea of using exposed spiral ductwork throughout the house. The ducts wouldn’t be hidden, but would instead become decorative and part of the design aesthetic.
I immediately loved the idea. For some reason, I had daydreamed about the possibility of having exposed ducts in the house, but had never seriously considered them as an option until he brought it up. We walked through what it would look like and how it would be built and I was sold on the idea.
The aim now is to have one heating and cooling unit on the roof for the upstairs zone. There will be one air-compressor on the roof, and we’ll also have a heating unit and an air-handler in the basement for the downstairs zone.
In order to make this work, we needed to make a compromise to the original design. We had to find two square feet of floor space in order for the ducts to come in and out of the basement. We decided to move the downstairs bathroom two feet into the living room area to accommodate this need. It’s not a very big loss, there wasn’t anything planned for that space anyway.
We had the HVAC guy pull the cut sheets for the roof units so the framer could build the mounts for them on the roof. With the architect’s blessing, we made the appropriate changes to the design and prepared the house for this system to be installed at a later time.
Making it Water-Tight
Once the frame is done, the next step is to make the house water-tight. This will enable everything else to move forward. This includes the roof, windows and doors, and the siding on the outside of the house.
The Roof
Once the frame was in place we put the roof on. This was a no-frills roof that didn’t require much of a decision to be made. The roofer built the roof in about one day, and used Johns Manville APeX 4S Embossed roofing materials.
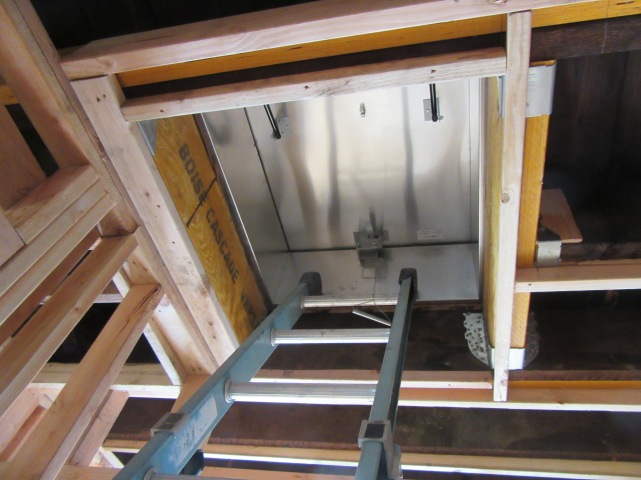
Looking up at the roof hatch from the second floor.

The new roof, facing the front of the house.

The roof facing the front of the house. The platform is for the heating/cooling unit.
The Windows
We had decided on Marvin Integrity All-Ultrex windows after a lengthy comparison shopping process. They had been specified and ordered a long time ago, and were waiting around in a Kuiken Brothers warehouse somewhere for us to call them and say it was time to install. Once the roof was in place, it was OK to have the windows delivered and installed.
This was exciting for me as it was the first finishing touch we’ve applied to the house. I got to see what the finished product looked like once they were put in.
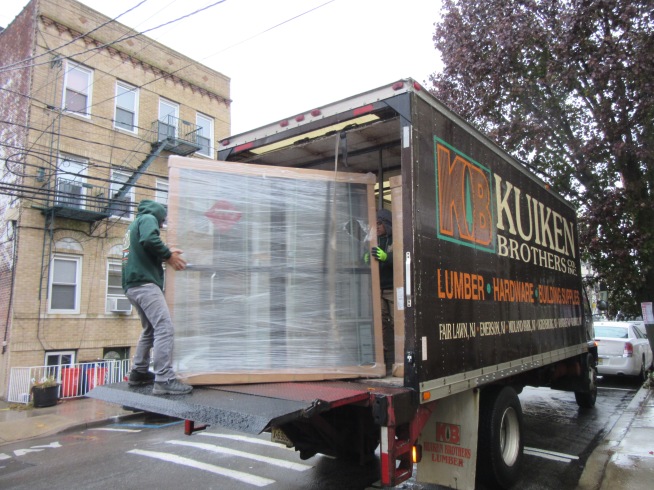
My friends from Kuiken Brothers delivering the windows.

The windows and the front door are installed on the front of the house.
The Doors
The doors became an interesting decision to make. The architect stated the that height of the doors needed to match the height of the window cut outs for aesthetic purposes. This meant the doors had to be 90” tall. This is tricky as most doors are 80” tall. You can’t even really google 90” doors, virtually nothing pops up.
I found a few samples for the front door that I liked on Houzz to give my GC a few ideas, but we couldn’t find one in my size. He took a look at one of the pictures I sent him and he came up with an idea. He thought he could get a very cheap door with no markings on it fabricated as a special order for very cheap. Later on, we can hang decorative markings on it and paint it to somewhat match the picture I showed him. So, we ran with that idea and ordered a plain 90” door.
The back door was a little different. We decided to go with a standard door with a glass panel in the middle to get some more natural light in the house. We picked one from the Thermatru line of doors. In order to match the 90” height, we had it shipped with a custom-built transom window above it.

The windows and the back door are installed on the back of the house.
The basement door was a standard-build, as simple as it gets. It just needs to function, it doesn’t have to be pretty.
The Ancient Art of Japanese Siding?
The drawings were rather vague when it came to the siding on the front of the house. It just said something about cedar planks shaped with tongue-and-groove connectors in the front and the back, and vinyl siding for the sides of the house. My contractor called the architect to ask him what he had in mind for the decorative siding in the front. The architect asked the contractor if he was sitting down.
The architect then proceeded to explain that he wanted to use Shou Sugi Ban siding. Shou Sugi Ban is an ancient Japanese method of charring cedar planks with fire to prepare them for use. The planks have an interesting look to them, and the treatment also makes them more fire resistant.
Well, the GC and I had never heard of this, and my architect had never used them on any of his projects before either. But this was the way he dreamed up my project and I’ve trusted his judgment thus far so we got to work in researching this possibility.
First thing we did was to Google it, of course. Shou Sugi Ban pretty much consists of three steps:
- Burn the wood with a torch
- Brush it off by hand
- Treat it with some kind of oil finish
We also found a few places that sell pre-made Shou Sugi Ban siding planks. One is in Texas, the other in Pennsylvania.
The architect was so excited about seeing this come to life, that he volunteered to help us practice making these boards. So, we all met at my contractor’s house and got started. The contractor bought a blow torch that hooks into a regular propane tank and a few samples of tongue and groove cedar planks.
Working on the rough side of the planks, we charred them with the torch. It didn’t take very long at all for the planks to turn black. If we held the torch in place for just a bit longer, the surface would start to crack in a pattern that resembled alligator skin.
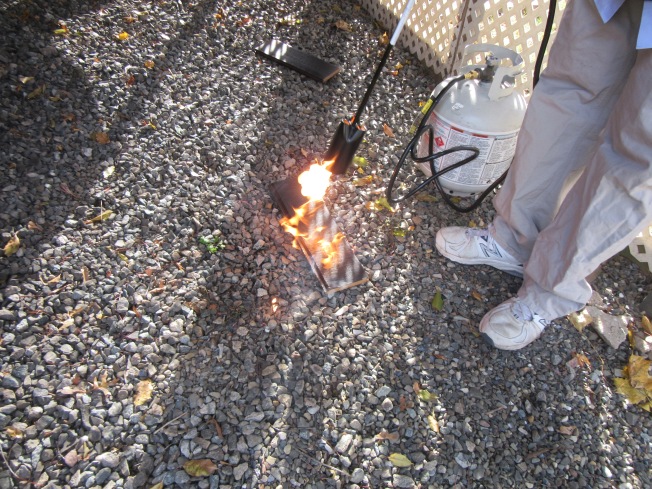
That gas tank isn’t just for BBQ! It is also for making Shou Sugi Ban siding!
The contractor had also stained some planks black as a control group to hold next to our Shou Sugi Ban samples. We held them next to each other and could see the difference. There was more color depth in the charred boards, and the alligator texture gave it a very interesting look.
Next, we brushed the charred board off. The alligator skin cracks immediately came off, and the board reverted to a more brown-like color. This wasn’t the look we wanted at all, so we rejected the idea of brushing the boards off.
The problem became to figure out how to preserve the alligator skin cracks on the boards. We figured that if they brushed off so easily, they’d weather off right away when we hung them on the house. So, we applied two coats of polyurethane to one of the boards, drying it quickly with a heat gun after each coat.
We took that sample and rubbed it with our fingers. No residue came off and it looked like the two coats of poly did the trick. The board held on to the color and texture we wanted, and it had a nice shine to it as well. All we had to do was to remove step #2 from the traditional process and we had the look we wanted.
We put the sample board down next to some vinyl siding samples and settled on one of them that matched best. The vinyl siding will wrap most of the sides of the house, and maybe the back. We’re considering Shou Sugi Ban planks for the back of the house if they aren’t cost prohibitive.
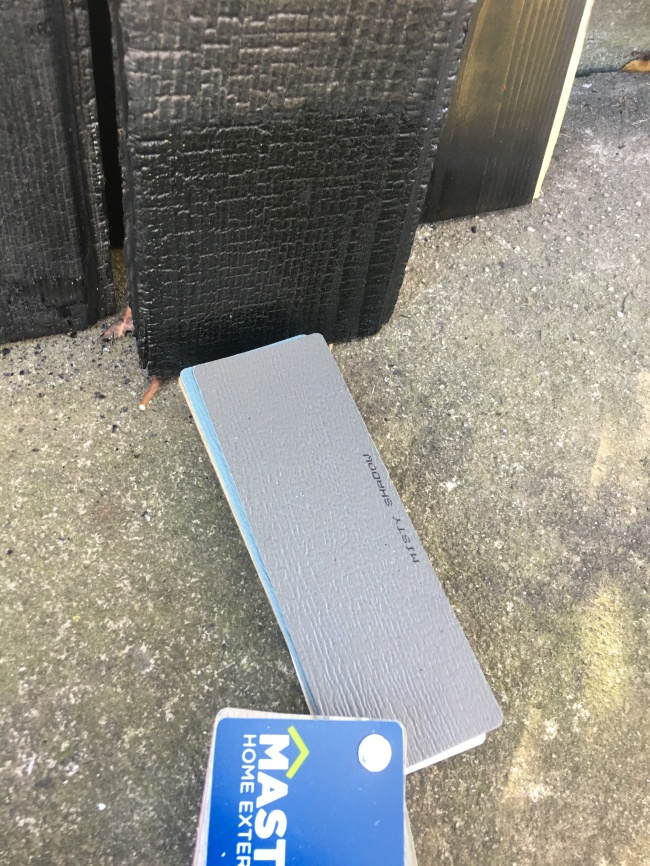
The very bottom of this sample board is the Shou Sugi Ban we are looking for. The rest of the house will be wrapped in vinyl siding in the “Misty Shadow” color shown here.
We’re going to price everything out this week, including getting a quote from the millshop in Pennsylvania that sells these types of planks off-the-shelf. With any luck, we have a decision made early in the week and we can get the siding started shortly thereafter.
Next Up
Following the completion of the siding, we will start on the rough plumbing work. This will require some final decisions on the layout of the kitchen and bathrooms. This will include all of the various water fixtures (faucets, pot fillers, shower heads, etc.) so we can buy the rough-in valves that go behind the walls.
I reached out to my kitchen designer and we picked up the work we had started a year ago. I went back to the showroom and refreshed my picks for the water fixtures throughout the house. I also refreshed my wish list for kitchen appliances as well. This was all my designer needed to get started on planning the final layouts for the kitchen and bathrooms. When this is done, we can mark off where the valves need to go so the plumber can install them.
Bottom line is that we are moving at a faster pace than we ever have since the project started. I’m communicating with the designer, contractor, and architect almost every day and we are making design decisions as we go. The fun part is finally here! Now, I just need to start to see the light at the end of the tunnel. I still don’t have an ETA for completion and I have to continue to plan for the worst-case-scenario.

Nice to see some serious progress! I think your project is turning a corner. It is still ahead of mine. Trenches for the footers were dug last week, and hopefully we get them poured this week.
I love that you did the Shou Sugi Ban. That will look stunning from the street. I’ve been waiting to see someone I know actually do it. I’ve read it can be way cheaper to just torch the cedar on site, depending on you local labor costs. I thought we might do that as well for the wood sided parts of our house, but our architect held firm on bark siding. Probably because it is even stranger and more obscure 🙂
The windows look great. I like the double hung without divided lights. Its a good match to your overall design. We also ended up selecting Marvin windows too, Marvin Ultimate, where the other choice was Kolbe.
LikeLike
You’re the only person I know that has heard of Shou Sugi Ban siding. From the samples I’ve seen online, a lot of them are brushed to the point you can’t even tell they’ve been charred. I think that if we’re going to do it, I want the charred look. We’re pricing it out right now, but it could very well end up being prepared with a torch in my contractor’s backyard.
I varied the window design from the architect’s original plans. He wanted big glass panes along with small casement windows for openings. From a practical standpoint, I didn’t want casement windows because then the screens would be inside the house and the cats would shred them in about a week. Not to mention, I’ve heard a lot of anecdotes about their lack of durability. So I worked with the contractor and the lumber yard to come up with a modified plan to use double-hung throughout the house instead. I like the way they came out, too. I didn’t post pics from the inside yet, but there is a lot of natural light because of how large they are, and they have the most minimal amount of frills I could find.
Good luck on your project, I think you’ll still beat me to the finish.
LikeLike
I think it’s really cool you tried sealing the unbrushed surface and that it actually worked. It will look fantastic. I think the brushed look is more traditional, since the technique was originally only a way to preserve the wood. Good news is that charred cedar is known to last more than a hundred years.
Also consider that you could spend $50 on a torch and a weekend charring the siding yourself in the backyard.
LikeLike
I’m not 100% convinced that the unbrushed surface won’t weather off over time, but I’m willing to give it a shot. My contractor is still considering if he can even do it… I told him I can grab a torch and get involved if need be!
LikeLike