Just over one calendar year since I closed on the house and construction has just started to get underway. I keep getting questions like “You moved in to your new house yet, bro?” or “You sell your old place yet?” so I figured I should explain that we are really just getting started and I am staying put in my cozy Hoboken condo until my new place is livable.
I took fewer days off this year during the summer than I normally would. I reasoned that I needed my vacation days to spend time with the contractor and to go showrooming to shop for finishes. Due to the delays we had in getting started, I never used those vacation days and I was set to lose them at the end of the year. So, I put in for the week off with a loose plan to meet with my kitchen designer, my contractor, and to do some shopping for finishes. I managed to get a lot done, both in learning the process for how a house is built, and making some finishing decisions.
The First Non-Budget Expense
You’re supposed to double the original time and budget estimate when you build a house, right? We’re already double the time estimate, but if we double the budget estimate, I go bankrupt and move back in with my parents. Let’s hope that doesn’t happen.
Anyway, it wasn’t entirely unexpected, but the gas regulator happens to be right inside the garage door. The garage is already very tight and one wrong move when parking the car, and I could rip the thing right off the wall. We called PSE&G, filled out a few online forms, sent a few e-mails back and forth, and finally convinced their engineers to come to the house to assess the situation. They seemingly came up with a plan to move the regulator to outside the house, and they will re-route the pipe so it is nowhere near the car anymore. They decided that the exact amount of $2,294.59 will cover their troubles. I’m waiting to hear back from them as to when they are going to come and do the job, but it is good to have it paid for and know that it will be taken care of.
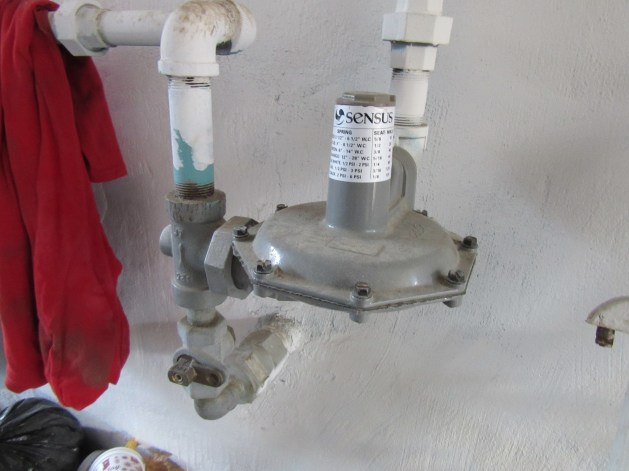
The gas regulator which would be about four inches from where my car is parked if left there. PSE&G will relocate it to a safer spot.
Masonry
Construction work has begun with the masonry phase of the project. As I mentioned in my previous blog post, there were special considerations with this project because there is not enough room on either side to bring in construction equipment. We had to find a mason who had a crew with shovels and wheelbarrows that could dig out the basement for the rear extension by hand.
They had to start by removing the one-story kitchen, the basement underneath it, the backyard stairs, and the basement wall. They did a very good job of keeping the job site clean and orderly as they did all this. They pretty efficiently removed all of the debris as they created it.

The one-story kitchen was removed and the basement underneath it was demolished.
Next, they had to grab their shovels and start to dig. They dug out the area around the perimeter of the new basement extension, and the outdoor kitchen wall. They built trenches deep enough to make room for the concrete footings at the depth specified by the city.

The crew digging out the basement the old fashioned way.
Following that, they built a frame and outfitted it with steel rebar. We had to pause at that point in order for the town to come to inspect the depth and construction of the frame. Of course, this lead to about two weeks of delays. First, despite the fact that 2016 has been a very dry year in New Jersey and we are in a drought warning, it rained the day the inspector was supposed to come. So, that pushed us back a week. When he came back, he complained that he didn’t like the fact that the vertical rebar wasn’t yet installed and that there was no bonding wire attached. My contractor argued that it wasn’t necessary to show the vertical rebar at that point in the inspection, and that there was no bonding wire in the drawings (that he personally approved) but we had to make the necessary changes anyway.

The frame for the footings.

The frame with the rebar, both horizontal and vertical.

This is the description of the foundation detail from the drawings that the city approved. The same guy who approved the drawings said we needed a bonding wire attached to the rebar in order to pass inspection, despite the fact there is no bonding wire in the drawings.
On the day of the next inspection, it rained again and the bottom of the trenches filled with water. The inspector claimed he couldn’t see the bottom so he couldn’t pass us. My contractor had to argue that he was just there and already saw how deep the footings would be and the inspector gave in and passed us. He cautioned my contractor not to pour concrete in the trenches until after the water drained, as if he were some sort of idiot that would do something like that.
The mason poured the concrete footings just before it got too cold to do so. The concrete hardened and they began to layer in the cinderblocks to frame out the basement. This is where we currently are in the process as of this writing.

The concrete footings.

Laying cinderblocks for the new basement.
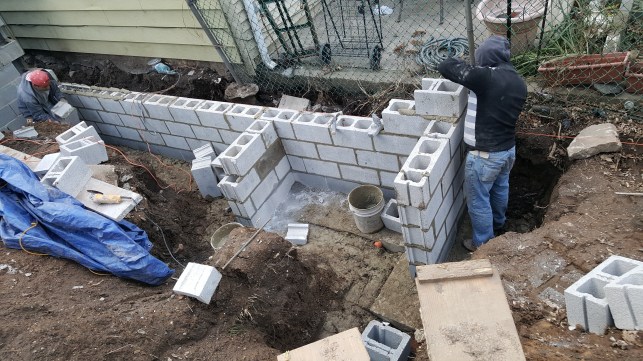
The short wall they are building is the frame for the outdoor kitchen.

Bonding the new basement wall to the existing structure.
The next step is to finish the drainage system, not only for the new addition but for the entire house. A local ordinance requires that all rainwater is drained into the sewer. We can’t have gutters that just drain to the yard. The way my architect drew it, he has the drainage pointing to an abstract new sewer connection. My contractor would prefer to use the existing sewer trap so as to not have to dig in front of the house, or possibly even in the street to create a new one. We are currently working with the architect to make this decision so we can move forward and finish the back extension.

The plumbing plan with the reference to the “New House Trap”. We hope to be able to use the existing house trap and to not have to dig up the sidewalk and street.
Kitchen Planning
While all this is going on, I’m trying to get ahead of the kitchen planning. I’d like to have the cabinets ordered well in advance so my kitchen designer can build them in parallel with other work that is being done in the house. I also needed to pick out a countertop so we can decide on coloring for the cabinets, the backsplash, and the rest of the downstairs. Due to the arrangement of the kitchen island in the middle of the open layout of the first-floor great room, I considered the countertop to be the most important finishing decision I’m going to make.
I had gone back and forth on this decision for some time, trying to decide between several kinds of engineered or natural stones. Each had some good and bad things about them. I noticed right away that I hated most standard quartz samples that every kitchen showroom had in stock.
In particular, every place I visited stocked Caesarstone quartz samples. There could not be a less inspiring and classless collection of quartz than what they have to offer. Each stone is more boring and dull than the next. While their quartz may be very durable, there is no way I wanted that look in my new house.
I was intrigued by recycled glass countertops, and took a look at IceStone and Vetrazzo. Both had distinct looks to them and were visually much more stimulating than regular quartz. I went so far as to order samples of both and even priced out a full Vetrazzo fabrication and installation. It was a tough call, but I had to pass on both. The price I was quoted was very high. Also, the slabs have a physical size limitation so they can’t be very big. As such, I would have had to have several unsightly seams on the island.
My kitchen designer sent me to the NY Stone warehouse in an industrial section of Jersey City, beneath the Pulaski Skyway. I never would have known it was there until she sent me. I was taken back by the sheer size of the place, it was huge and separated into four distinct bays.
The receptionist explained to me how the warehouse was laid out. I could walk through the four bays, taking pictures of the stickers on the sides of the slabs that I liked. When I was done, she’d help me compile a list. Bays #1 and #2 were regular slabs, bay #3 was mostly limestone and not really for kitchen use, and bay #4 was the exotic section. Bay #1 and #2 didn’t impress me at all, they were mostly bland slabs of white and grey with very little color to choose from. Most of the customers in those bays were couples fighting over which boring shade of white to buy.
I made my way over to bay #4 and was really excited by the exotic selections. There were a lot of very colorful stones to choose from. I had a preference for something in blue headed into the decision-making process, and they had many stones to choose from in various shades of blue. I took pictures of about 7 or 8 slabs and brought them back to the receptionist. At first, she said “You were only there for about 10 minutes, most people take much longer!” She then complied my list of slabs and then exclaimed “Wow, you have very good taste!” This compliment, of course, came as no surprise to me. It was still nice to hear.
I didn’t want to purchase anything without discussing it with my kitchen designer, so I made a return trip with her a few weeks later. We found a new set of slabs that really struck us both. Of course, it was one of the most expensive stones they had in the place, but I had to buy it. The NY Stone folks used a crane that is built into the warehouse to pull all 8 slabs they had for me to view them separately. I picked out the two best ones they had and paid for them. I am now the owner of two slabs of Labredorite Lemurian from Brazil!

One of the slabs of Labrecorite Lemurian I bought. This picture really doesn’t do it justice, but it is a very striking piece of stone. The blue accents change color as you change your viewing angle. They are highly reflective and add a distinct characteristic to the stone. It will match well with a number of shades of blue and gray on on the cabinets and walls.
The slabs are still sitting in the NY Stone warehouse. At some point in the near future, they will be sent to the fabricator to be cut up in the shapes I need them for my cabinets when they are built.
It is quite a relief to have this decision made, I’ve been working on it for almost a year. Now that we have the color of the stone that will be on display in the middle of the house, I can work on coloring for the cabinetry and then the walls.
My kitchen designer also advised me that I should pick out kitchen and bathroom faucets in advance of the plumbing being done. Each shower head and faucet require their own diverters and valves that need to be fitted before the walls are built. So, I have to pick out everything by the time the house is framed so I don’t hold up the start of the plumbing installation.
On her advice, I visited the AF Supply showroom in Fairfield, NJ. I walked around somewhat aimlessly for a bit until somebody had mercy on me and asked if I needed any help. I explained her my predicament, that I need to build two and a half bathrooms and a kitchen with a modern design aesthetic. I have no interest in any transitional-looking fixtures.
With that in mind, she helped guide me through the showroom. We went bathroom room by bathroom room and discussed how each should look and function, and what fixtures would go with each. I learned about wall mounted sink faucets, vessel sinks, and three-way diverters for bath-shower-body sprayer combination setups.
By the end of our walk-through, we had picked out fixtures for all three bathrooms, as well as the kitchen. I even picked out a vessel sink and a waterfall faucet for the downstairs bathroom. When combined with a cool vanity, tile, and lighting fixtures, it will have the vibe of a bathroom in a trendy restaurant.
She sent me a PowerPoint presentation with pictures of all of my fixtures, as well as a cost breakdown. I wouldn’t say that I fully made a hard decision on everything just yet, but I certainly have something to work with and I anticipate that the end result will largely look like what we picked out that day.
Next Up
Next up for the contractor is to do the front masonry work. We will partially demolish the front of the structure and check the footings for suitability for the two-story addition we are putting there. When that is complete, we can frame the house. And when the framing is done we really can start almost everything else, roofing, siding, insulation, plumbing, heating and cooling, and electricity. Needless to say, I am very anxious to get the house framed so the real fun can begin.
No, I am not moving in anytime soon. Expect an invitation to a Hoboken St. Patrick’s Day party at my current home sometime soon…
